
Project
Introduction
A "Project" in D3E Studio serves as the central entity where all code and designs are organized and developed. This document provides detailed documentation on creating and managing projects within D3E Studio.
Creating a Project
To create a project, follow these steps:
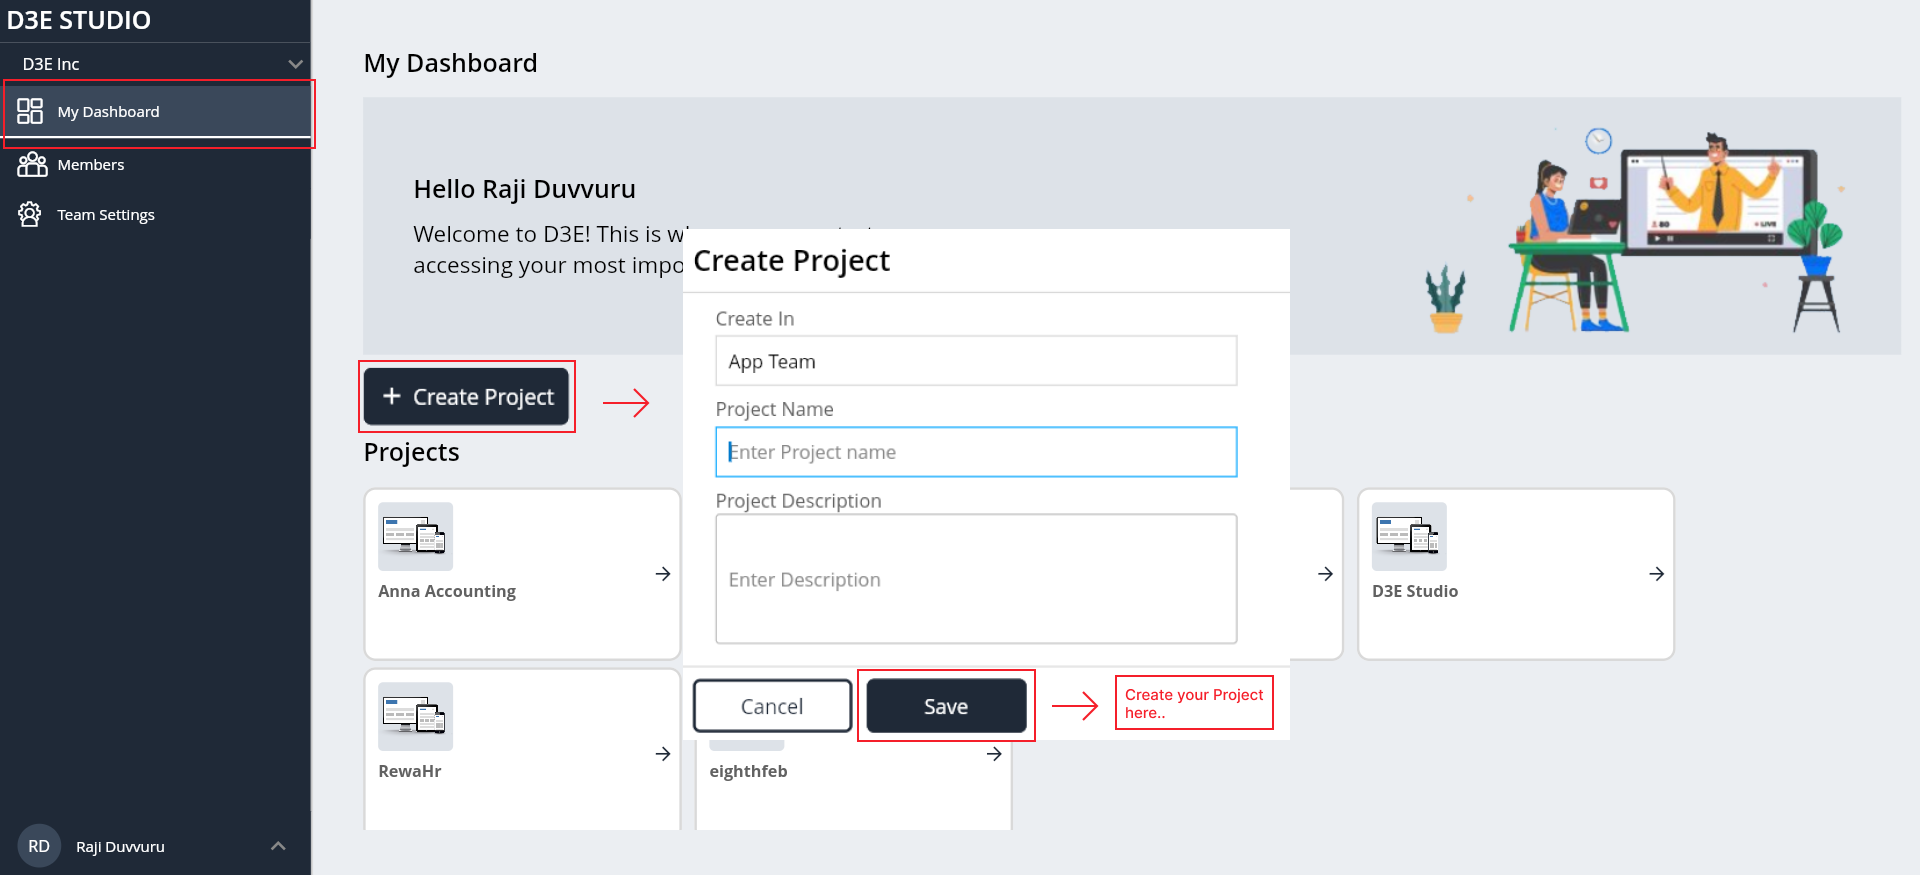
Step 1: Open Dashboard
- Navigate to the dashboard within D3E Studio.
Step 2: Click "Create Project"
- Click on the "Create Project" button to initiate the project creation process.
Step 3: "Create Project" Popup
- In the "Create Project" popup, you'll find a "Create In" field, displaying the name of the team you are currently associated with.
Step 4: Enter Project Details
Project Name: Enter a name for your project in the "Project Name" field.
Project Description: Provide a brief description of your project in the "Project Description" field. This description helps convey the purpose and goals of the project to you and your team members.
Step 5: Save the Project
- Click the "Save" button to create the project.
Step 6: Accessing the Project
- Once created, you can access the project from your dashboard and begin working on it.
Opening a Project
When you open a project in D3E Studio, you are directed to the project page a central hub providing essential information about the project. This document details the components typically displayed on the D3E Studio project page, including project name, branch, pull requests, and build and deploy information. When you open a project in D3E Studio, you are directed to the project page—a central hub providing essential information about the project. This document details the components typically displayed on the D3E Studio project page, including project name, branch, pull requests, and build and deploy information.

1. Project Name
- The project name is prominently displayed at the top of the project page, serving as a quick reference for the project identity.
2. Branch Information
- Information about the current branch being worked on is visible. This helps users understand which branch their development environment is synced with.
Clone
- Cloning a project in D3E Studio allows users to create a local copy of a project from the D3E platform, enabling collaboration and development in a local environment. This step-by-step guide outlines the process of cloning a project using Git Bash. It specifies the URL for cloning the project repository, or to download the source code.
3. Pull Requests
- A section dedicated to pull requests provides an overview of any pending or completed pull requests related to the project. Users can easily access and review proposed changes.
Note: For more information about Branch and Pull requests go to "Branch and Pull request".
5. Build
- Information related to the latest build status is displayed, providing insights into the success or failure of the build process.
6. Deploy
- Users can access details about the deployment status, indicating whether the latest changes have been successfully deployed.
Note: For more information about Build and Pull Deploy go to "Build and Pull Deploy".
Steps to clone the project
Prerequisites
- Before proceeding with the cloning process, ensure the following prerequisites are met:
1. Git Bash Installation:
- Ensure Git Bash is installed on your system. If not, download it from the official Git website.
2. SSH Key Setup:
- Generate an SSH key and add it to your D3E account for secure authentication.
Note: For more information about SSH Key generation go to "SSH Key".
Cloning Process
Step 1: Open the Project
- Open the D3E Studio project you want to clone.
Step 2: Copy Clone URL
- On the top right of the D3E Studio, click on the "Clone" button. Copy the displayed clone URL.
Step 3: Navigate to Project Folder
- Open the folder on your local machine where you want to clone the project.
Step 4: Open Git Bash
- Right-click within the folder, and select "Open git bash here" to open Git Bash.
Step 5: Paste Clone URL
- In the Git Bash window, paste the copied clone URL by right-clicking and selecting "Paste."
Step 6: Clone the Project
- Press "Enter" to initiate the cloning process. You will see progress messages, and once completed, you'll receive a confirmation like the one below:
Cloning into 'ProjectName'...
remote: Counting objects: 97, done
remote: Finding sources: 100% (510/510)
remote: Getting sizes: 100% (426/426)
remote: Compressing objects: 100% (56/56)
remote: Total 510 (delta 47), reused 509 (delta 46)
Receiving objects: 100% (510/510), 2.01 MiB | 462.00 KiB/s, done.
Resolving deltas: 100% (47/47), done.
Step 7: Change Directory
- After cloning, enter the command cd projectname (replace "projectname" with the actual project name) to navigate to the project folder. Press "Enter."
Step 8: Checkout to Branch
- To switch to the desired branch, use the command git checkout branchname (replace "branchname" with the actual branch name). Press "Enter."
git checkout branchname
Step 9: Confirmation
- Once completed, you will receive a confirmation like the below one:
Switched to a new branch 'branchname'
branch 'Test' set up to track 'origin/branchname'.
Step 10: Verify Project
- Verify that your project is now available in the respective folder on your local machine.
Following these steps ensures a successful cloning of a D3E Studio project using Git Bash, allowing users to work on the project locally and collaborate effectively.
Moving of Project
- Moving a project in D3E Studio involves transferring a project from one team to another team within the D3E platform. This process is applicable only to team administrators. The following step-by-step guide outlines the process of moving a project to a destination team.
Steps to Move a project
Prerequisites
- Before initiating the project move, ensure the following prerequisites are met:
1. Team Administrator Role:
- You must have the team administrator role for the source team from which the project is being moved.
Moving Process
Step 1: Open the Project
- Open the D3E Studio project that you want to move.
Step 2: Click on Move
- On the project card, click on the "Move" button. This action will prompt the moving process.
Step 3: Select Destination Branch
- Choose the destination branch, which represents the team to which you want to move the project.
Step 4: Confirm Move
- After selecting the destination branch, click on the "Move" button to confirm the move operation.
Step 5: Verification
- The project will be automatically moved to the selected destination branch. Verify the completion of the move with a successfull message.
Step 6: Check Destination Branch
- Navigate to the destination team where you moved the project. Ensure that the project is now available in the new team.
Project Deactivation
Project owners have the option to deactivate a project if it is no longer in active use.
Deactivation helps organize and declutter the user's workspace.
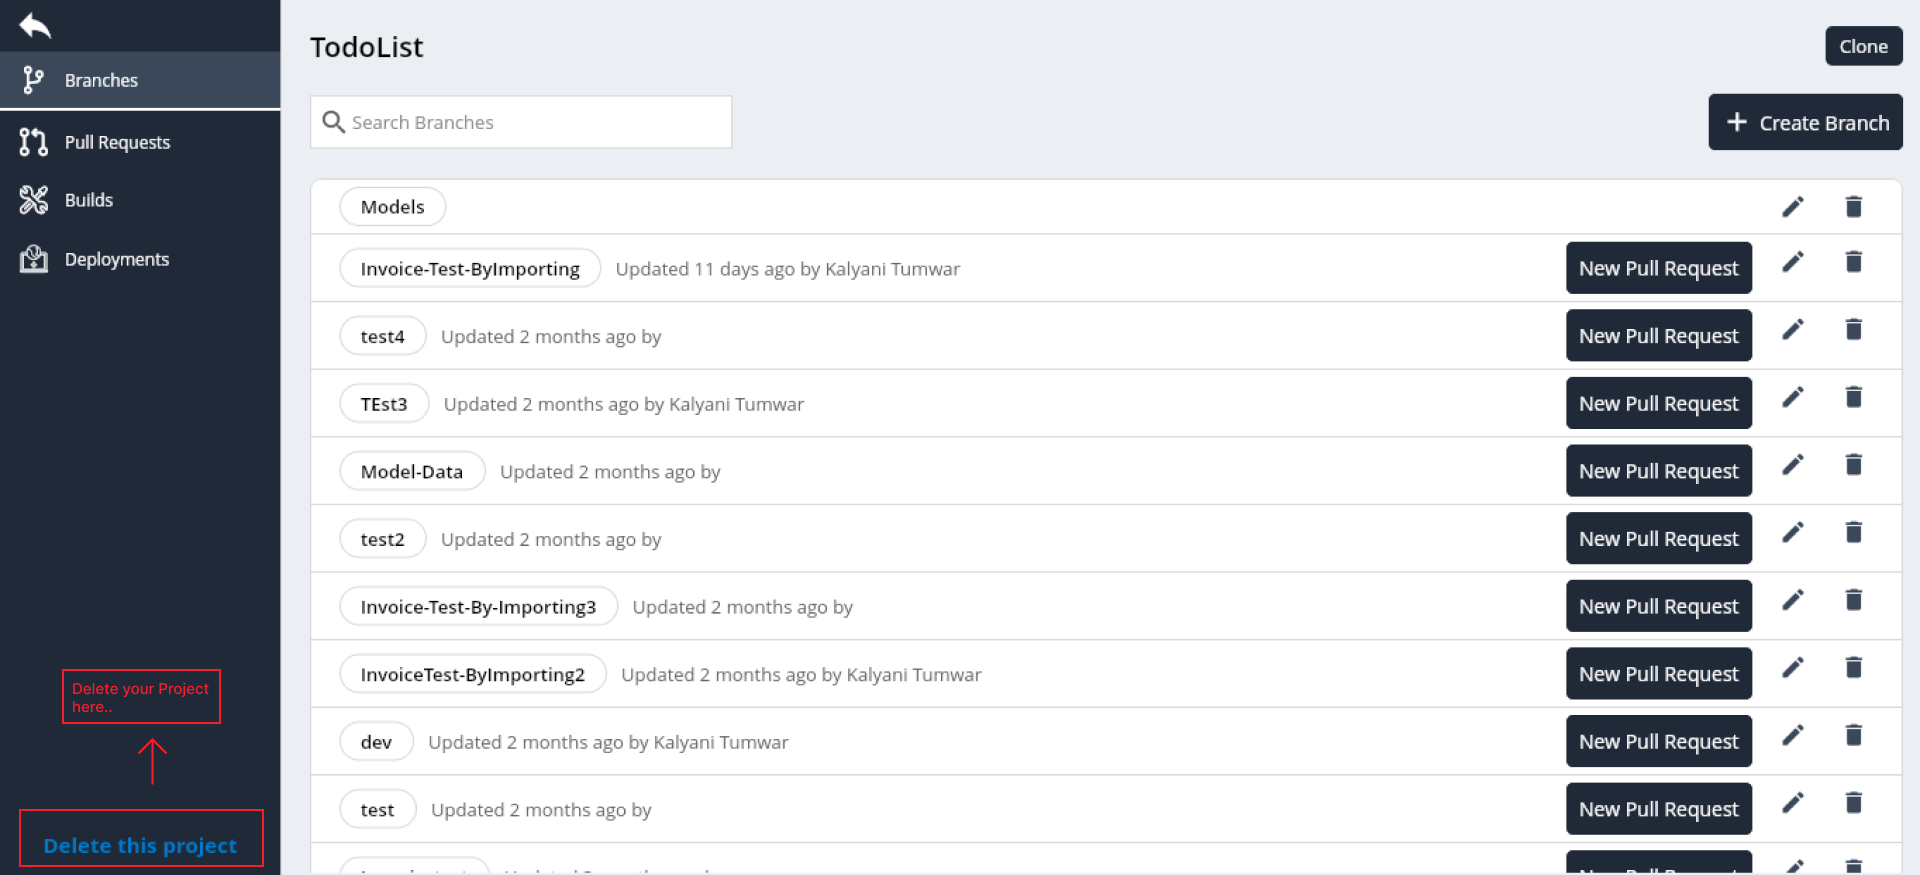
Steps to Delete a Project
Step 1: If necessary, you can delete a project.
Step 2: Open the project locate the option to delete the project.
Step 3: Confirm the deletion to permanently remove the project.
Conclusion
The D3E Studio project page serves as a comprehensive dashboard providing crucial information about the project's current state, collaboration activities, version control status, Continuous Deployment processes. Users can efficiently navigate, collaborate, and monitor the project's development and deployment lifecycle from this centralized hub.